Earlier this week I showed my new Facebook Welcome page that uses WordPress to serve the content.
In the article I mentioned that I would go through the steps involved in doing this.
Here we have the first step, which is making a custom WordPress template. You will need to know how to use FTP, copy and edit a WordPress template, and assign the template to a WordPress page.
Making a WordPress page template
- When I need to make a new WordPress page template, I usually start by making a copy of my page template, page.php, and then customizing it. Please note that if you are using a WordPress framework, such as Genesis or Thesis, you will need to follow their instructions for making a page template as you probably won’t have page.php file to start with.
- Go to Appearance > Editor > page.php. Copy everything and paste it into a text editor.
- Make sure you work from the file on your computer in the text editor and not from the WordPress editor.
- Add the following code to the top of the file. This is from the WordPress Codex on creating your own page template.
- Change ‘Snarfer’ to what you would like your page to be named. You could use Facebook. Save the file with that name and give it the .php extension. For example, facebook.php
- You will now want to edit the template. For example, I removed the call to the header and pasted the header code into directly. I then changed the reference to the stylesheet because I made a new stylesheet for this template. I was going to make the changes to the existing stylesheet but I decided I wanted to keep them separate. I also ran a query for the last three posts, added code for the slideshow, and code for the contact form. You can remove a lot of the code but you do want to keep the WordPress loop so you can pull in blog posts and other components from your site. I also needed a much smaller header because of Facebook’s width limitations so I made a smaller one and pulled into the template rather than the one that is on this site. If there is interest, I could provide more detail and perhaps a sample template.
- Upload the new template via ftp to your theme directory – wp-content/themes/name of your theme – you can do this even if you aren’t finished editing it because you can continue adjusting it through WordPress, as it will now be your editor with the rest of the templates, before adding it to Facebook.
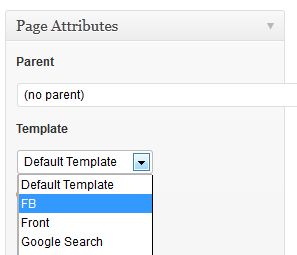
- In WordPress go to Pages > Add New. Give the page a name and then under Page Attributes select your new template from the Templates drop down box. You don’t need to add anything into the editor as your code will be on the actual template.

- You can publish the page and then view it like any other WordPress page. If you want to make edits to the code you will do that through Appearance > Editor. If new pages get added to you navigation menu automatically, you will want to exclude this new page from appearing – especially since it’s going to look different than the rest of your site. If you are using WordPress’ new-ish menu system under Appearance > Menus then this won’t be an issue. Just don’t add the new page to the menu.
- If you are going to use a new stylesheet, you will want to create that, upload it to your theme directory via ftp and then reference it in the header section of your new page template. For example, I made a copy of my existing stylesheet, edited it, saved it with a new name, uploaded it, and then referenced it via the new page template. I didn’t need a lot of the code in my stylesheet, so I could have just copied over the parts I needed and made adjustments. I found it easier to copy over the entire thing and then remove the parts that I didn’t need.
- Remember that the new template and stylesheet are available in the WordPress editor after you upload them so you can edit them via Appearance > Editor.
<?php
/*
Template Name: Snarfer
*/
?>
After getting this all set up and creating an iframe application for a new Facebook page tab, I realized that the WordPress URL wouldn’t give me a SSL url that I could use with Facebook so the tab would only work if I wasn’t logged into Facebook securely. In the next post, I’ll discuss how I got around that.
photo credit: horiavarlan


